If you’ve been using Microsoft Windows 10, you’ve probably noticed that this operating system automatically downloads software updates. Whenever Microsoft releases a new update to Windows 10, Windows 10 downloads those updates by default without informing the user. Although it is better to use an updated OS, it often costs a lot of internet data. This is a cause for concern for those with limited internet data. Many times the PC restarts to install the update and takes time to upgrade. There is no direct option to turn off automatic updates from Windows 10 settings. But with a little strategy, you can easily turn off Windows 10 Auto Update.
This post describes two different strategies for turning off Windows 10 Auto Update. You can use any one of these conveniently.
Those who use the Internet on a Windows 10 PC via a WIFI hotspot can use this method. If you set your internet connection to ‘Metered’, Windows will understand that this connection is not unlimited, so updates will not be downloaded automatically when connected to it. However, if the connection name / hotspot device is changed, if the meter is not set again, the auto-update will be turned on again. So if you change the name of the connection or the hotspot device, you have to set it as ‘Metered’ anew. Here’s how to identify a WIFI connection as ‘metered’:
While the PC is connected to the Internet on your WiFi hotspot, click on the Start button and open ‘Settings’ from the Start menu.
Open the ‘Network and Internet’ section from Settings. Click on the ‘WiFi’ section there. The name of the currently connected WiFi network can be seen on the right. Click on the name of that WiFi network.
Turn it on by clicking on the ‘Set as Metered Connection’ switch at the bottom of the page that appears.
From now on, Windows 10 updates will not be downloaded automatically on your current WiFi internet connection.
This way you can also meter the broadband connection connected to the PC. In that case, use the ‘Ethernet’ option just below the WiFi section.
If you ever want to start Windows 10 Automatic Update again, turn it off by clicking on the Set Set Metered Connection switch under the heading ‘Metered Connection’ in the above method.
Downloading updates to Windows computers is a routine process of software, which can be turned off with a little cunning. This will prevent the process from running automatically, so the Windows 10 update will not be downloaded automatically. Let’s see how it can be done.
1.Hold down the Windows key on the keyboard and press the R button to launch the run command (i.e. press Windows + R).
2. Now in the run command box, type services.msc in the box and press enter button.
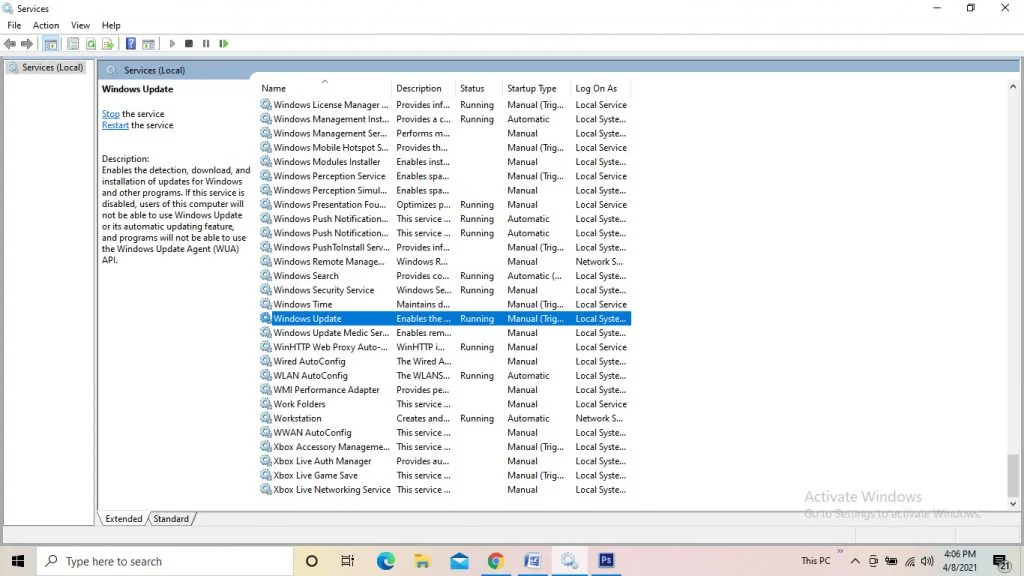
3. Now a window will open, in which the names of many services will be written in the form of a list. Find the Windows Update service at the bottom of the list and double-click on it to open the service’s Properties menu.
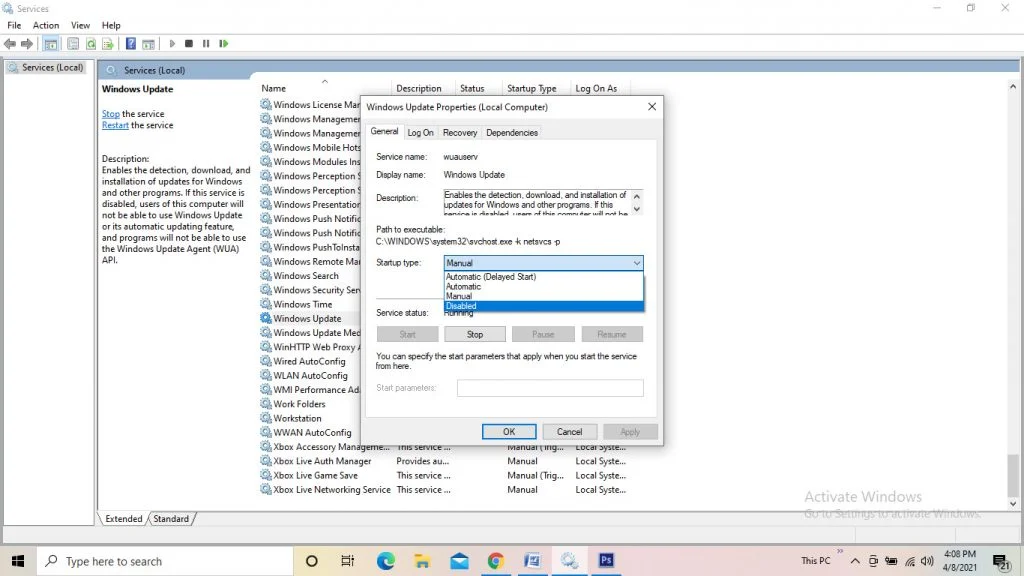
4. Here on the ‘General’ tab select the ‘Disabled’ option for ‘Startup Type’ and click on the ‘OK’ button. Now the computer will want to restart. Restart. By now, Windows 10 updates will never be automatically downloaded to your computer.
If you ever want to start Windows 10 Automatic Update again, select the ‘Automatic’ option for ‘Startup Type’ in the above method and click ‘OK’.
Windows 10 updated off processes